A couple of weeks ago, one of our gorgeous brides, Vanessa Saldana, liked my posting about the beautiful Elizabeth Taylor and suggested I do a post on the various signature makeup tricks of Hollywood icons and modern-day starlets, and I love this idea!
With the help of my favorite beauty websites, let’s take a look at the famous makeup techniques and how we can get them at home! I’m mixing up modern stars with the legends, so we can cover tricks from across the board 🙂
1. Judy Garland’s Red Lips

Her mouth needed to be famous, as it’s the gateway to that incredible, unmatched voice, and she achieved this by always appearing with her lips in a trademark scarlet. Red lips are not the easiest things to perfect though, so I turned to The Beauty Bean for their detailed tips on both choosing the right red, and applying it properly. Here’s their expert advice!
- 1 The key to achieving any bold lip is to hydrate your lips. Cracked and peeling lips will make your lipstick bleed and look uneven. After leaving the conditioner on your lips for no long than five minutes, wipe the product off with a tissue.
- 2: To get a long lasting lip apply a red lip liner over your entire lips. Find a shade that will complement the lipstick you are using.
- 3: Apply a red lipstick.
- Choosing your red lipstick:
- Have a warm, more olive complexion? Look for fire-engine reds with orange undertones.
- Have a fair, cool complexion? Look for cherry reds with blue undertones.
- Dark skinned? You lucky ones looks good in just about every shade.
- Still not sure of the shade for your perfect pucker? Look at your vein color: if you have blueish veins you should look for blueish reds, have greenish veins, looks for orange-reds.
- Choosing your red lipstick:
- 4: To ensure that your red lip will not bleed take an angled brush, such as one that you would use to line your eyes, and dip the brush into any compact powder that you may have and trace it below your lip line. (Tip: if you went a little overboard with the powder or if the shade was off and you now look like you have compact powder mustache, no worries: just take a blending brush and buff in.)
- 5: If you prefer matte red lips, then your finished. If you feel, however, that your lip still needs to be cranked up one notch add a gloss on top. A clear or dark pink lip-gloss will make your lips pop.
Check out The Beauty Bean for more amazing makeup tips!
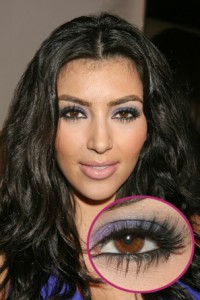
2. Kadashian Lashes

Oh my those girls are pretty! The Kardashian girls got a lot by way of genetics, but one thing they are always sporting are mega-long lush lashes! Obviously, they weren’t born with these, they’re just masters of putting on fake lashes (or their makeup artist is). I am a total klutz in this regard, so let’s turn to Ehow.com and this is what they listed as instructions!
- 1: Remove false eyelashes from container by lifting one end with tweezers and lifting gently.
- 2 : Looking into mirror, hold eyelashes up to the base of your own lashes to see if the ends need trimming. If they are too long, simply cut the end with the shorter lashes. Be careful not to over trim. Most lashes do not need to be trimmed more than 1/2 mm(about 2 lashes).
- 3 : Open lash adhesive and dab small beads of glue along the inner lash line. Connect the beads with the tip of the adhesive. Be sure not to use too much! This will result in clumps and longer drying time. Wait for glue to become tacky (about 20-30 seconds).
- 4 : Apply lashes to the base of your lashes getting it as flush as possible. Sometimes the tweezers can be useful here to pat down the lashes until glue dries. Adjust as needed before glue fully dries. Allow to air dry approx. 2 minutes.
- 5 : Now use black liquid liner starting at the inner corner of lash line and extend out just a bit beyond outer lash line. This line should be as fluid as possible. If you are inexperienced with liquid liner you may use a pencil or cake liner using same technique. The eye liner over the lash line helps blend the base of your own lashes with the falsies!
Read more: How to Apply false eyelashes | eHow.com
3. Marilyn Monroe’s Beauty Mark

As if you could pick just one point on the amazing Marilyn to copy, but one thing we all think of when seeing her iconic pictures, is her perfectly placed beauty mark. It isn’t something everyone can pull off, and it isn’t for every occasion, but man that amazing beauty mark is just so….cool. For this one, I looked to Bella Sugar for their advice! This is what their article says….
- Consider your coloring: For the most flattering beauty mark, don’t stray too far away from your natural coloring. If you’re a redhead, for instance, a rusty brown pencil will probably do the trick. If you’re a fair-skinned brunette like me, black probably isn’t the best option. Look at the undertones and intensity of existing moles and freckles for the best results.
- Choosing a formulation: An eyeliner or eyebrow pencil will probably give you the most control, but here are some other options: liplinermatte eyeshadow with a wetted eyeliner brush; liquid pot of color with a small stiff brush; or waterproof mascara dotted on with a brush. Whatever you decide, choose a shine-free finish and look for long-wearing, waterproof formulas.
- Location: Try placing your mole on the upper or lower lip, on the side of the chin, right above or off to the side of an eyebrow, or on one of the cheeks. If you’re not sure, pick a spot that highlights your favorite feature. Whatever you do, avoid going overboard by limiting it to just one mark.
- The application: To prevent slippage, first create a base by applying a primer, foundation, or concealer. Next, use small circular motions to draw on your mark. The less perfect the better. Set with a translucent powder.
- Other options: There’s always the permanent tattoo option, but for completely temporary fix.
Check out Bella Sugar for all kinds of beauty and style tips!
4. Taylor Swift’s Cat Eyes

Ah Swifty, how I love thee. This little girl sure does rock the big cat eyes! She always has that perfectly winged out eyeliner, and while I know a professional is doing it for her, there must be a way to get a little bit of that look at home! I’m letting EHow.com weigh in on this one as well…..
1: You have two main options for product–liquid liner or pot liner with an angled, thin brush. Truthfully, the best way to understand which is your best friend for the job is to test out both.
2 : Let’s pretend you’ve decided on the liquid–in my estimation, an inferior choice, but some of you just can’t get down with a brush and I respect that–so, liquid. Choose the shortest pen-tip you can find–bizarrely, my faves have been drugstore finds. The shorter the tip, the more control you have.
3 : Set up a hands-free magnified mirror–you’ll need all the hands you can get for this one. Starting with the inner corner of your eye, barely touch the pen to your lashline and slowly drag toward the outer corner of your eye.
4 : The key is to make your line as close to the lashes as humanly possible–if you want to fatten it up later, by all means do.
5 : As you round toward the edge, sort of flick your wrist slightly but confidently toward your temple. It’s better to make a longer extended liner–we can always q-tip it off later. The key is more about placement of wing, rather than the length initially.
6 : All of these steps need to be done with an open eye. It’s really hard to tell what something as specific as a winged liner will look like when your eyes are open, if you apply when your eyes are closed. This holds true for almost any shadow application, too. As much as you can flex your little eye-muscles to be able to hold both eyes open when you apply, the more you’ll know exactly what your face will look like when you’re done.
7 : Open both eyes and with a normal expression on your face (not a raised brow) and assess your work. If the wings are uneven, take your pointed q-tips (the best for makeup blunders!) and in upward motions, symmetrize your wings to your heart’s content.
Read more: How to Create the Perfect Cat-Eye Liner | eHow.com
And as always, I love idea of pro-makeup tips to make us look more like the glamorous women of the world, but your own signature look is even better! Keep rocking the look you know and love, and maybe toss on a beauty mark Friday night and some red lips Saturday 🙂
xoxoxoxo


by kimberlyjarman
Vanessa - Love it!